BLEACH London At Home Dye Kits: Rosé


Saturday 19 October 2013


First off, apologies for the lack of posts. It's been difficult to find the time recently with starting final year of uni. Hopefully I'll get time to post a bit more often again :)

I always get bored of my hair so easily and I've been toying with the idea of dying it pink for a little while. I succumbed to the hype surrounding these dyes and headed to Boots on launch day to buy a bottle. The range features darker colours for a bolder look/use on darker hair and lighter, pastel colours for light blonde/bleached hair. The bottle says the colour should last between 2 and 10 washes.

I chose the shade 'Rosé' as it looked like the exact pink I was going for. 


The process of dying the hair was incredibly easy. I'm not an expert by any means, but all I did was section off my hair, starting with the bottom layer and worked the dye from root to tip. If you follow the instructions on the bottle then you'll find it very easy to do. I have quite long and thick hair and didn't find the process tedious at all as the consistency of the dye made it easy to work with. I left the dye to develop for about 20 minutes, just to make sure it'd got the chance to work. After I'd washed the dye off and dried my hair, I was left with a lovely pastel pink tint all over and I absolutely love it!

This is my hair before:


this is my hair after:


It took one bottle to do all of my hair. I probably could have done with one and a bit just to make sure everywhere was covered, but one did the job. I've washed my hair once since and the colour has come out a little bit, but it's still pink all over. I've already repurchased rosé and hope it clings a little more with a second coat.

BLEACH dyes are available from Boots stores with the colour dyes retailing at £5.

*Also, a little warning: do not use the 'Parma Violets' shade of the BLEACH dyes. They have been recalled due to staining/damaging peoples' hair so please don't buy it if you still see it out there! I haven't heard anything bad about the other shades, only this one*

have you tried BLEACH dyes yet? what colour is your fav? 

leave me a comment below or hit me up over on twitter/instagram
also give me a follow on bloglovin' and GFC!


eBay find: Lipstick Storage


Wednesday 17 July 2013


hi guys!

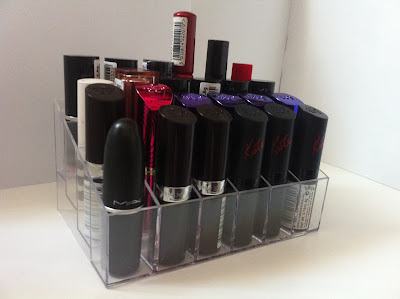
Are you as fed up as I was of rummaging through your make up to find the lipstick you wanted to wear? It would take me ages to find a random lipstick amongst all the products and even longer if I had a specific shade in mind.

I was browsing eBay when I found this incredible (and pretty) solution to my problem.


It kind of reminds me of the tiered seating you get in stadiums.. 


As you can see the storage unit holds 24 lipsticks of different shapes and sizes, so as long as your lipsticks aren't abnormally huge then they should fit perfectly.
The unit is see-through and so it will fit in well in amongst any colour of furniture. 

The lipstick storage has been such a saviour as now I have all my favoured lipsticks neatly displayed so I can easily grab the colour I need if I'm in a rush or just not in the mood to rummage.

It's such a bargain too! I've seen them online for around £10 before, but I bought mine from eBay here for only £2.99. It does ship from Hong Kong so delivery may take slightly longer than usual, but mine only took a week. Postage is free and I wasn't charged any customs or anything like that. It literally cost just £2.99, which I think is pretty incredible!

how do you store your lipsticks? any genius and efficient ways of storing the rest of your make up?


how to: Paisley nails


Saturday 29 June 2013


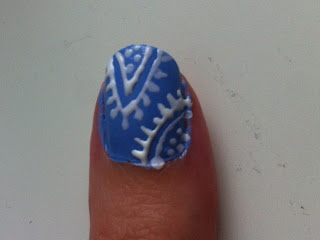
After seeing paisley print dresses and dungarees all over the place, I decided to have a go at recreating it on my nails.


I used essie's Bikini So Teeny as my base colour and a white nail art pen for the design. If you don't have a nail art pen, you can use a thin brush.

Here’s how I did it:


Once you have allowed the white varnish to dry, apply a clear top coat to blend it all together and help prevent chips


Get creative with base and pattern colours!

are you a fan of paisley? will you be giving this a go?


 follow me on bloglovin/GFC/twitter and leave a comment!


Gelly Hi Shine Nail Paint by Barry M


Tuesday 11 June 2013


I'm a big fan of the super shine nails I've been seeing around recently, and when I saw that Barry M were launching these 'Hi Shine' nail paints I had to give them a go.


The application was very easy as the varnishes have a consistency that is easy to work with, and are not gloopy at all. It took 2 or 3 coats before it was fully opaque and dried a lot faster than other polishes I've used.

I chose Greenberry and Papaya, both of which are very bold, bright colours that definitely get noticed. 


Do Barry M fulfil their claim of high shine? Yes! I got many compliments on how shiny my nails were! They began to chip after 3 days, so now when I use them I add a chip resistant top coat to preserve them for a little longer. I definitely prefer the Gelly polishes to the regular Barry M polishes I've tried in the past.

Gelly Hi Shine nail paints are available in Boots and Superdrug for £3.99. (Superdrug are currently running a 3 for 2 offer!)

 have you tried a Gelly polish yet? did it live up to your expectations? what's your favourite shade?

Remember to follow me on Google Friend Connect / twitter / instagram and leave a comment!


MUA: Undress Me Too Palette


Tuesday 4 June 2013


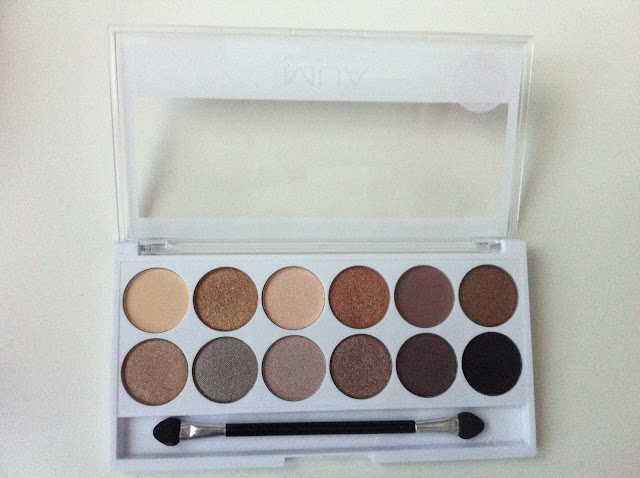
I've wanted the Urban Decay Naked 2 palette for a while now, but never seem to have the spare £36 for it. When I saw that MUA had created a dupe of it for only £4 I had to give it a shot.


The palette comes with a double ended eye shadow sponge brush, which is good enough to use, but I prefer to use this eye shadow brush also from MUA.

The palette has 12 shades, each with their individual names which is a nice touch.


(L-R) Naked, Devotion, Shy, Fiery, Lavish, Dreamy, Tranquil, Exposed, Reveal, Wink, Obsessed, Corrupt

The shades are neutral, earthy tones which are perfect for achieving both day to day looks as well as more dramatic night time looks. Some of the shades are matte, whilst others have a shimmery metallic appearance, meaning you have a shade and finish to fulfil all of your neutral eye shadow based desires. All of the shades have great pigmentation and have lasted up to 8 hours when I've used it, even without using a primer or base beforehand.

I would definitely recommend you buy this palette, whether it's to be used everyday or as a back up for your Naked 2 palette. For such a small fraction of the price of the Naked 2 palette, it is an excellent dupe and has taken pride of place in my make up bag.

You can find MUA products in their online store here, or in Superdrug who are running a 3 for 2 offer, so take advantage!

have you used MUA's products before? what did you think of them? are you a fan of the Undress Me Too palette?

don't forget to follow me on GFC (can find it on the left side of my blog)

*Freebie Alert*: L'oreal's Nude Magique CC Cream & Twinings


Friday 31 May 2013


Upon browsing the internet, I stumbled across a couple of free samples that I want to pass on to you, how nice am I? The products aren't related to each other in any way, so excuse how random they might seem.

1. The first freebie is of L'oreal's Nude Magique CC Cream, which has smart pigment capsules which transform into a lightweight foundation and offer 24 hour hydration.


 By signing up you recieve a sample of your choice of three CC creams: anti redness, anti fatigue and anti dullness.

You can access this freebie here

2. The second freebie is for all you tea drinkers out there. Twinings are offering free samples of two teabags of your choice of fifteen flavours, as well as a 50p off coupon if you decide to purchase a box after you've enjoyed your sample.

You can access this freebie here 

Happy free tea drinking and foundation wearing!


Have you already tried L'oreal's CC cream? What did you think of it?
Which flavours of Twinings took your fancy? 


DIY: Caged Bra


Tuesday 7 May 2013

Hi guys!

Sorry it's been a while! Revision and exams literally took over my life, but now I'm back and today's post is quite exciting!

I've been admiring the caged bra for quite some time, but I've only ever seen ones I like with price tags waaaay out of my range accompanied by a hefty customs charge. 


So I decided to do what I always do, make my own version of it for a small fraction of the price.


All you need is:

- black braided elastic size 9mm (which I bought here)
- black braided elastic size 6mm (which I bought here)
- needle
- black thread
- scissors
- pins
- strapless bra

Obviously you have free reign with the design of your caged top, so get creative with colours, sizes of straps and patterns
Maybe draw up some simple sketches so you can try out different designs and decide which one you like best before you commit to cutting your elastic. This is the sketch that I am working from:

(it really doesn't need to be any more extravagant than this, it's just to make sure you know what you're doing!)

1. Firsty, take your bra and try it on so that you can see where you want your straps to go. Strapless bras often come with these 'tags' where you could attach the straps that come with it, so you might want to use them as your guide. 

You could use the straps that came with your bra or you could use a normal bra (i.e. not strapless) but if you do this, the caged section might not flow as well if the straps are different materials and have a different appearance.

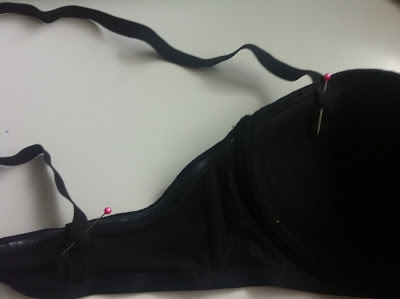
2. Take the wider of your two elastics, in my case it was the 9mm, and attach it to the back of the bra using a pin. Bring the strap over the front of your body and determine how tight you want it to be, then fix it to the front using a pin.
ALWAYS make sure you leave about an inch extra, you can always cut it off at the end, it just makes everything so much easier and it can be tidied up later! 


3. Use your needle and thread to sew these areas in place, do the same to the front and back on both sides so that both straps are secured.


At this point, you should put the bra back on to decide where you want to position the straps to create the caged effect. I'm not going to post pictures of this step for two fairly obvious reasons...

4. Following the design you sketched earlier, use needles to fix the 6mm elastic in the positions that you want it to be. Make sure the elastic isn't too tight or too loose as it will be disfigured when you wear it. 
Once you have done this, sew each of the joints in turn, make sure to leave an inch or so extra elastic at each end.


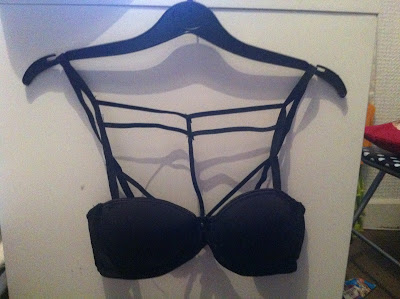
Once you've done that, you'll have something that looks a bit messy, like this:


5. All you need to do is take your scissors and trim the excess elastic to make the joints neat. Once you've tidied it up, that's it! Congratulations on your new on-trend, cheap as chips, caged bra!


This picture doesn't do it justice! As you can imagine, it looks different on the hanger than it does on the body, as the straps hug and compliment your shape. Mine cost me a grand total of £4.78 because the only thing I needed to buy was elastic, as I used an old bra & needles and thread etc that I already had.

Are you going to give it a try? Get creative with patterns, materials, and cute little add-ons like these satin roses. Take it even further and try the caged look on a crop top or strapless dress! 

Leave a comment if you have a question or a design idea // tweet me a photo of your finished caged bra!